Keihin PB32C Carburetor
- Details
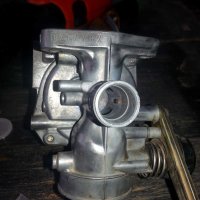
Float Height Adjustment
FLOAT HEIGHT
For the C70 the specs are 10.7mm or 0.42". measured from the bottom of the float to the base of the carburetor where it meets with the bowl. The measurement is made with the float hanging more or less straight down -- the boss above it. The spring on the needle valve is in contact, but not depressed.
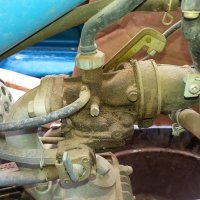
For the C70, Beatrice Cycle sells a gauge to check the height. For an in-place check, connect a piece of fuel line to the carb drain valve at the bottom and tape it up to the side of your carb. Put the bike on the center stand or otherwise make it level. Open the carb drain valve. Get a gauge or ruler and measure right where the carb body meets the float bowl to the level in the hose. Don't move the hose after you open the drain, or it could cause the reading to be high.
Hopefully you'll see 0.5mm above the base of the carb body, +/-1mm, (only about .08" variance). If it needs to be adjusted, and the carb is already off the bike, the method in the factory manual is the easiest way to set the float height.
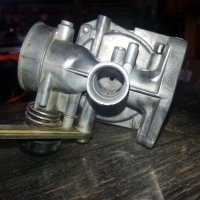
After disconnecting the gas and draining the fuel out, you'll need to remove the carb and take the screws off the bottom of the float bowl and remove it. Then push the pin out of the float boss and gently remove the float and float valve. Some float valves will be hanging loosely on the float by a very thin wire that slips over a metal tang on the float. Bending this tang on the float (not the wire on the float valve), will raise or lower your float level. Just a small bend makes a big difference in the level, so it's best to make minute movements here.
Before bending anything, visually inspect the rubber tip on the float valve and spray some carb cleaner and compressed air in the valve seat, to make sure nothing is blocking it. Also see that the plastic float isn't leaking and filling with gas. Then check the level again and rebend if needed.
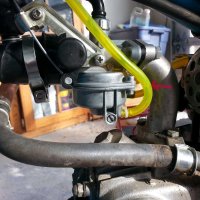
The photo shows an easy trick to check the fuel level without removing the carburetor. Be sure to close the valve/screw when your finished.
The air screw adjusts the amount of air that passes over the opening The air screw adjusts the amount of air that passes over the opening of the slow jet, using vacuum to pull fuel up from the bowl. Since the throttle slide is almost completely closed at idle, the air screw and slow jet bypass the closed carb venturi and act as the baseline providers of fuel mixture for idle and low speed throttle response. You add a little fuel and air when you set the idle screw up a bit, but without the slow jet throttle response in the low registers would be slow and choppy.